Hershey Kisses Fabric Roses

You've seen these made out of celophane, I like to make them out of fabric scraps!

You've seen these made out of celophane, I like to make them out of fabric scraps!

Hershey Kisses Fabric Roses

We are getting close to Valentine's Day, a holiday represented by roses if there ever was one.

The first Hershey Kisses rose someone gave me was made out of clear celophane. I loved the idea so much I took it home to use as a template to use up some of my fabric scraps. Although with fabric it's not easy to know what is inside, I found an easy way to make that clear.

To make Hershey Kisses fabric roses, you will need:

a 3"x5" fabric piece per flower; select a light or medium weight fabric.

 1 or 2 leaves per flower, either cut out of green fabric or pre-made;

Spray starch;

2 Hershey Kisses per flower;

1 wooden cooking skewer;

Floral tape.

Glue.


I cut out some green leaves out of fabric, which worked well when I ran out of pre-made ones.

I cut out some green leaves out of fabric, which worked well when I ran out of pre-made ones.

To make, glue two Hershey Kisses bottoms together. I like to mix a hug with a kiss or two hugs. Depends on the message you want to send so I will leave what kind of Hershey chocolate you sue up to you.

Insert cooking skewer into one end. 

If you use a light fabric that is green for leaves, you may need to spray with starch and iron to keep the leaf from falling over. 

Place other Hershey Kiss end into center of fabric and wrap fabric around the Hershey chocolate. I add the little Hershey id paper to the outside before wrapping with floral tape so the recipient knows what is inside.

Add a leaf and wrap floral tape around the bottom. Add a gift card and deliver with love!

Add a leaf and wrap floral tape around the bottom. Add a gift card and deliver with love!

A bouquet is nice but the single flowers are even nicer, especially if you add a little personal card.

Fun to make and even more fun to give!

For more cooking, gardening, beekeeping and easy home decor tips, subscribe to Garden Notes.

Charlotte

Easy Pie Filing Desert

A sprig of fresh spearmint finishes off this serving of key lime pie filling. (Photo by Charlotte Ekker Wiggins)

A sprig of fresh spearmint finishes off this serving of key lime pie filling. (Photo by Charlotte Ekker Wiggins)

Easy Pie Filing Desert

Over the years, I have worked with some amazing cooks especially pie makers. I learned quite early not to even try to match their pie crusts.

One year, I took the plunge and made a pie filing without a pie crust, serving it as a desert. The hack stuck and now I make most of my favorite pie filings for desert without a crust.

Key Lime pie, for example, makes a lovely summer desert. Bake it in a bread pan and double the meringue - 4 eggs whites with 1/2 cup of sugar beaten until the egg white peaks are stiff. Spread over the cooked pie filing.

Bake in oven at 350F for 7-10 minutes until meringue is light brown.

A glass bread pan nicely holds the pie filing to bake the meringue. (Photo by Charlotte Ekker Wiggins)

A glass bread pan nicely holds the pie filing to bake the meringue. (Photo by Charlotte Ekker Wiggins)

After removing from the oven, let cool before serving. Don’t even try to snatch a taste, the filing will be quite hot. If you need to speed up the cooling process, you can place the glass bread pan in the refrigerator.

You can also bake these in individual ramekins to have ready to serve portions.

Other good pie filings to make include lemon meringue, chocolate and yes, even apple and cherry pies. I wouldn’t add meringue to the berry pies but whipped topping is handy to have when they cool off.

Charlotte

How to Preserve Ripe Strawberries

These fresh strawberries from Aldis are delicious but will quickly spoil. (Photo by Charlotte Ekker Wiggins)

These fresh strawberries from Aldis are delicious but will quickly spoil. (Photo by Charlotte Ekker Wiggins)

How to Preserve Ripe Strawberries

The joke in this Midwest state is that people stock up on milk and bread as soon as the forecast calls for bad weather. There’s something about a Missouri snow storm in the forecast that makes me worry about not having enough fresh strawberries.

When I found a great supply at my local Aldi’s store, I stocked up. These are smaller, longer strawberries but with great flavor. The challenge is not to let them spoil and that’s quite easy: freeze them.

After a good wash and gently drying with a kitchen towel, I cut the strawberries into smaller sliced pieces and placed them on a tray to freeze. Aldi’s produce is from non-pesticide suppliers so the produce is not treated with wax and other preservatives found in other stores.

I like freezing the individual pieces so that I can easily choose the size of helping I want while still preserving the rest of the strawberry supply.

Cut up strawberries frozen and ready for packing in plastic bags. (Photo by Charlotte Ekker Wiggins)

Cut up strawberries frozen and ready for packing in plastic bags. (Photo by Charlotte Ekker Wiggins)

It’s that easy. Whether its blueberries, blackberries or strawberries, this is a fast and easy way to preserve them so you can enjoy them later.

Reminds me of the Strawberry Shortcake dolls that used to be the rage!

Charlotte

How to Save Summer Tomatoes

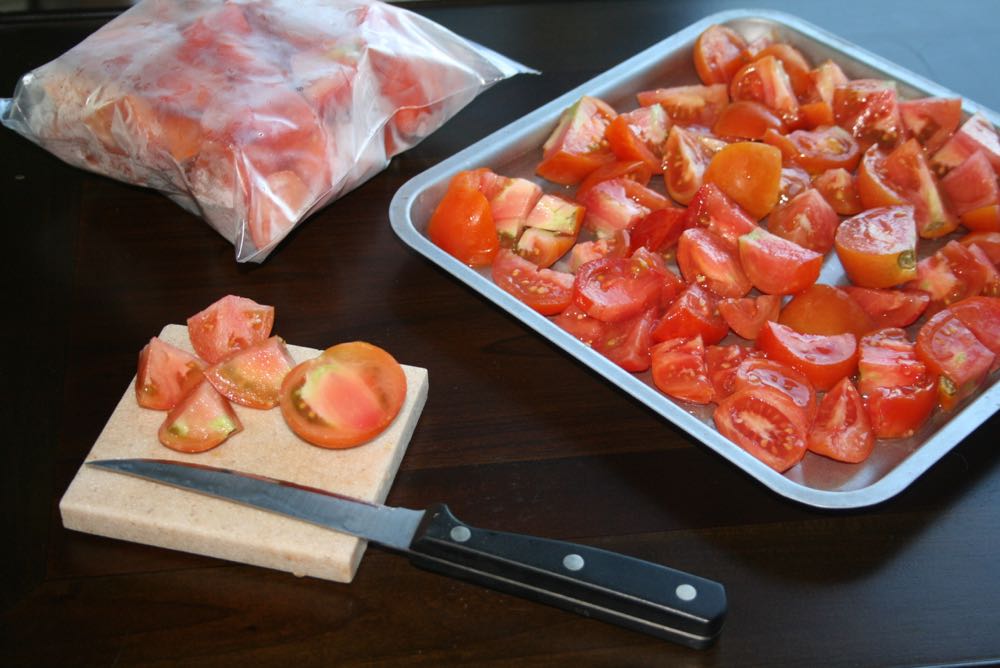
Some of the tomatoes I grew last year, sliced into quarters and individually froze. (Photo by Charlotte Ekker Wiggins)

Some of the tomatoes I grew last year, sliced into quarters and individually froze. (Photo by Charlotte Ekker Wiggins)

How to Save Summer Tomatoes

Tomato season is almost here so this is a good time to talk about the easiest way to save some of the wonderful summer tomato flavors out of our gardens for the upcoming winter.

Tomatoes made a wonderful base for chili, soups and sauces. Chili is my favorite dish to cook mid-winter using some of my saved summer tomatoes. Soups are second so whatever tomatoes I save, they will both become smashed in the cooking process.

The first step is to pick wonderfully tasty tomatoes that are ripe and ready to use. After washing and letting them drip dry on a towel, I cut them into quarters and place in a tray that fits in my freezer.

A couple of hours later, when they are individually frozen, I toss them into a good quality freezer bag and return them to the freezer for winter use. If I remember, I will mark on the bag when I froze them and what kind of tomatoes they are. Considering that most of my tomato plants are volunteers that sprout early spring in my inside plant pots, most of them are of the mystery variety.

Friends of mine go through the canning process but I find this much quicker and easier to do.

Charlotte

Leftover Omelet Waffle

Egg omelet right out of the waffle iron and ready to eat. I freeze half for another meal.

Egg omelet right out of the waffle iron and ready to eat. I freeze half for another meal.

Leftover Waffle Egg Omelet

One of these days I should make this with fresh ingredients but this is one of my go-to recipes when I have leftovers to use, especially vegetables. I have yet to make these the same way twice in a row so know this is very flexible and easy to do, I would add this to your collection of basic recipes if you don't already have it.

This serving was made with four egg yolks with 2 tablespoons of water added since I used the egg whites in another recipe. You can also use regular eggs with a yolk and egg white, I just had the yolks available from another project.

Then I minced a few cherry tomatoes that had seen better days and drained the juice off before adding to the eggs. If you add the juice it makes the mixture too runny.

I also added a dash of minced yellow onions, cut up fresh cilantro and some fresh rosemary sprigs from a rosemary plant growing in one of my bay windows. Fresh herbs make everything taste better!

Eggs can have a lot of things added included old cherry tomatoes and fresh herbs.

Eggs can have a lot of things added included old cherry tomatoes and fresh herbs.

You can add grated cheese if you have some, or leftover additional protein like baked chicken or salmon but I didn't have any available.

You can mix all of the ingredients in the same container, then add seasonings. I like garlic salt and a dash of regular salt. Other options are black pepper, chili seasoning and cumin.

Here's the egg omelet mixture ready to use, add something green to brighten up the mixture.

Here's the egg omelet mixture ready to use, add something green to brighten up the mixture.

Spray the waffle iron with non-stick cooking spray on both sides, heat it to the recommended temperature and pour the mixture in to cook.

Let the mixture stand in the waffle iron for a few seconds before removing so you don't tear it.

Cooking in my mother's old waffle iron almost ready to remove. Let it sit for a few seconds first.

Cooking in my mother's old waffle iron almost ready to remove. Let it sit for a few seconds first.

You can also make these and freeze them for breakfast, I used to do that when I was going to an office every day to work.

For those of you who like a specific recipe, here it is:

Leftover Waffle Egg Omelet Recipe

3 eggs

Cut up vegetables to taste: a dash each (that's about 1/8th of a cup) of yellow or red onions; green peppers; tomatoes; broccoli.

Optional: another dash of shredded cheese, a medium cheddar would be nice

Added protein: baked chicken, salmon, leftover sausage or bacon*

*you can add these in the mixture or sprinkle on the mixture once it's in the waffle iron to make sure it's evenly spread through the eggs

Seasonings to taste: salt/pepper/garlic salt

Non-stick cooking spray

I frankly don't add additional protein unless I have something that has no future in my cooking except to be added to these eggs. Or I need the container for something else. I can get pretty attached to a particular container!

To freeze, cut up into quarters and place on a small cookie sheet in freezer for about an hour, then store in a freezer bag for later use.

Have you made these before?

Charlotte


Hershey Kisses Fabric Roses

You've seen these made out of celophane, I like to make them out of fabric scraps!

You've seen these made out of celophane, I like to make them out of fabric scraps!

Hershey Kisses Fabric Roses

We are getting close to Valentine's Day, a holiday represented by roses if there ever was one.

The first Hershey Kisses rose someone gave me was made out of clear celophane. I loved the idea so much I took it home to use as a template to use up some of my fabric scraps. Although with fabric it's not easy to know what is inside, I found an easy way to make that clear.

To make Hershey Kisses fabric roses, you will need:

a 3"x5" fabric piece per flower; select a light or medium weight fabric.

 1 or 2 leaves per flower, either cut out of green fabric or pre-made;

Spray starch;

2 Hershey Kisses per flower;

1 wooden cooking skewer;

Floral tape.

Glue.


I cut out some green leaves out of fabric, which worked well when I ran out of pre-made ones.

I cut out some green leaves out of fabric, which worked well when I ran out of pre-made ones.

To make, glue two Hershey Kisses bottoms together. I like to mix a hug with a kiss or two hugs. Depends on the message you want to send so I will leave what kind of Hershey chocolate you sue up to you.

Insert cooking skewer into one end. 

If you use a light fabric that is green for leaves, you may need to spray with starch and iron to keep the leaf from falling over. 

Place other Hershey Kiss end into center of fabric and wrap fabric around the Hershey chocolate. I add the little Hershey id paper to the outside before wrapping with floral tape so the recipient knows what is inside.

Add a leaf and wrap floral tape around the bottom. Add a gift card and deliver with love!

Add a leaf and wrap floral tape around the bottom. Add a gift card and deliver with love!

A bouquet is nice but the single flowers are even nicer, especially if you add a little personal card.

Fun to make and even more fun to give!

Charlotte

Food Jar Pincushion

One way to decorate a food jar, use counted cross stitch top with makers initials for pincushion.

One way to decorate a food jar, use counted cross stitch top with makers initials for pincushion.

Food Jar Pincushion

Every year, I am blessed with friends who share their homegrown produce in jars. It's a wonderful treat in the middle of a cold winter, and I have a tendency to save them for a special day.

One such jar was pickles. I finally had a friend over for lunch and decided to share the pickles made from a secret family recipe. To my surprise, there was a surprise under the fabric tied over the top of the pickle jar. Here is what I found:

Instructions to tuck under the fabric top of a food jar on how to make the jar into a pincushion.

Instructions to tuck under the fabric top of a food jar on how to make the jar into a pincushion.

Talk about recycling, the instructions are how to turn the food jar into a 10-minute pincushion!

Now I recycle jars for a variety of things: to store buttons, seeds, pins, dried coffee grounds for my roses, fresh dried catnip and cat toys getting refreshed - what a great idea for another practical use after enjoying the special treats the jar originally carried.

It doesn't take much fabric, just a 6-inch circle:

A 6-inch fabric round is perfect to transform a pickle jar into a pincushion.

A 6-inch fabric round is perfect to transform a pickle jar into a pincushion.

I haven't turned the jar into a pincushion yet, will do that later after the holidays but wanted to share the idea with you now.

Great little gift idea, don't you think?

Charlotte

Watermelon Juice, a Toast to Rio

Watermelon Juice, an Ode to Rio

They were everywhere when I worked at the 1992 Earth Summit in Rio de Janeiro, Brazil. I suspect they are also keeping athletes and their families company during the 2016 Summer Olympics.

In 1992, I was the media advisor to the US Delegation to the United Nations’ conference, the first time all countries in the world had come together to try to agree on how to deal with our rapidly changing climate and related issues. It was a highly politically-charged environment. Soldiers lined the sidewalks to our hotel and conference center, and at one point I was wearing 18 access identification badges.

One of my favorite scenes from the Earth Summit in Rio, Amazon Indians seeing computers.

One of my favorite scenes from the Earth Summit in Rio, Amazon Indians seeing computers.

During our time off, a few of us visited some of the nearby fresh markets, especially on the weekend, and ran into vendors with carts loaded with watermelons. They would cut them up, juice, add ice and hand over a cold glass of summer.

I grew up some 180 kilometers north of Rio, on an island literally off the Atlantic Coast. I have very fond memories of monkeys in our backyard. now extinct; chasing lobsters at the beach across the street, and teaching parrots to sing. Don't be too impressed, it would have helped if I could have carried a tune myself.

Amidst those wonderful recollections are not ones of a love affair with watermelon juice. Not that it should be any surprise someone came up with a way to profit from this special treat, who hasn't had to change clothes after eating an especially-delicious piece of juicy watermelon?

I make my own juice but thought I would double-check recipes online in case I was missing some secret ingredient. Here’s the recipe I found on a Brazilian site:

How to Make Watermelon Juice

·       Cut the watermelon into wedges and remove the flesh from the green skin.

·       Cut it into small pieces, removing as many seeds as you can or better yet, buy a seedless watermelon to start.

·       Put the watermelon chunks in the refrigerator until it is very cold.  

·       Blend the watermelon chunks to a liquid.

·       You can either add sugar or honey to make it sweeter.

·       Pass the juice through a not fine sieve into a pitcher.

·       Add ice cubes and serve immediately. 

Charlotte’s Way of Making Watermelon Juice

(you didn’t think I would follow a recipe, did you??)

One of the ways we used to test watermelons for ripeness was cutting a triangle in the side.

One of the ways we used to test watermelons for ripeness was cutting a triangle in the side.

·       Pick out a nicely-ripe seedless watermelon. Now I do remember how my parents would select a ripe watermelon. The vendor would cut a little triangle in the side so they could check the fruit ripeness. Those days are gone, I'm told farmer's markets rules today don't allow for open fruit.

·        Place in refrigerator to cool.

Watermelon balls made with a melon baller come in handy as  a quick desert.

Watermelon balls made with a melon baller come in handy as  a quick desert.

       Cut in half. Using a melon baller, remove the inside of the watermelon with a melon baller and place watermelon balls in container. The nice thing about watermelon balls is that they are convenient to easily make watermelon juice. They can also be used for a quick desert or a refreshing treat on a hot summer day. Less mess, too!

Watermelon juicing requires these utensils and a blender if you need more than a couple of cups.

Watermelon juicing requires these utensils and a blender if you need more than a couple of cups.

·       Pour watermelon juice out of container through a strainer. This is important if you really just want the juice without watermelon chunks.

If you've collected most of the juice, there should be enough for a couple 8 ounce cups of juice without dragging out the blender.

Any available strainer will work to remove chunks of watermelon from the juice.

Any available strainer will work to remove chunks of watermelon from the juice.

·       Drink. Yumm!

Actually after straining, I added a watermelon ball to my glass. Go figure!

Actually after straining, I added a watermelon ball to my glass. Go figure!

·       To make more, blend watermelon balls in a blender. Pour through sieve.

·       Add ice. Serve immediately.

·       If you want to experiment, add a little ginger, a sprig of spearmint or a splash of lime to a serving.

·       If you decide to store for later use, know the juice separates so you will need to mix together again before serving.

Muito bom! (That's Portuguese for very good.)

Charlotte

Freezing Blueberries

Freezing blueberries individually makes them easier to serve later.

Freezing blueberries individually makes them easier to serve later.

June is blueberry-picking time in Missouri. There are several pick your own farms around where I live so anyone visiting me during these weeks can count on a trip to pick some.

Although some silly people - like one of my brothers who shall remain nameless to protect the guilty - worry about only picking what they can immediately eat, I don't believe there is such a thing as too many blueberries. What we don't eat fresh I freeze for enjoyment later, especially in the middle of winter.

Find the Right Container

I have several trays that fit my little door freezer so find one that works well with your freezer. A cookie sheet with raised sides will work, or even a pie or cake tin.

This is something that little hands can help you do so invite kids into the kitchen with you. Don't count the blueberries, some may inadvertently disappear in the process. 

After washing and drying the blueberries, spread them into a single layer on the tray and place in freezer until frozen for several hours.

Once frozen, store in a freezer bag for easy individual berry retrieval later. Having the berries frozen like this makes it easier to grab a handful for cereal or to spread in a salad.

Works With Other Fruit

This applies to almost anything else you want to freeze. Once you get the system down, it will be easy to preserve extra fresh fruit for enjoyment during the off season.

Charlotte

Baklava Revisited

Alex Pizza baklava topped with Greek Farms, Rolla, Mo. honey but there's more to serving this. (Photo by Charlotte Ekker Wiggins)

Alex Pizza baklava topped with Greek Farms, Rolla, Mo. honey but there's more to serving this. (Photo by Charlotte Ekker Wiggins)

One of the perks of hosting monthly beekeeping meetings is that people bring in goodies to share. One delicious offering comes from Mike Samaras with Alex's Pizza, Rolla, Mo., one of our beekeeping students.

Now I have enjoyed homemade baklava off and on over the years but it's not a dessert I have seen mentioned how to best serve in Missouri cookbooks.  

Mike said the best way to enjoy this delicious pile of filo dough layers filled with chopped nuts is to drizzle honey over the top. Already rich to my taste, adding honey seemed unnecessary but I tried it. It was delicious.

Then Mike said and the other part of how to serve this desert is to add a sprinkling of cinnamon.

A piece of Alex Pizza bahklava served drizzled with honey and a sprinkling of cinnamon. Yumm!

A piece of Alex Pizza bahklava served drizzled with honey and a sprinkling of cinnamon. Yumm!

I took a piece of baklava home, added a drizzle of my own honey and sprinkled with cinnamon. The cinnamon helped cut some of the richness and gave the combination a more subtle taste. Still wonderful and rich.

Thanks for the tip, and the delicious baklava, Mike!

Charlotte


Cooking Orange Daylilies

Several ways I enjoy eating, and serving, Missouri's orange "ditch" lilies.

Several ways I enjoy eating, and serving, Missouri's orange "ditch" lilies.

All Daylily Parts Are Edible

Jan Phillips in her book "Wild Edibles of Missouri" calls orange daylilies "another one of mother nature's grocery stores." Phillips says the whole plant is edible, from the young flower stalks in spring that taste like asparagus to the tiny, white root bulbs reminiscent of radishes.

Different Ways to Eat Daylilies

Over the years, I have used orange and yellow daylilies for salads and stuffed fare. Salmon and tuna salad inside the washed flowers with stamens removed are a lovely presentation, and the entire dish is edible. 

I also like the flower buds fresh. They are a nice addition to a salad or served on their own as a side dish. Remove the green stems before adding to a dish. They taste like green beans with a hint of onion.

Another way to enjoy the buds is to steam them. It only takes a couple of minutes to make the buds wilt so keep a close eye on them so they are not overcooked.

Wash in cool water, then allow to dry. When I wash mine, I keep them on their stems in a flower vase with water until I use them. The flowers only last a day so pick them right before you plan to use.

Make Sure Chemical Free

If you are going to eat daylilies, make sure you are picking them from a chemical-free area.

 Charlotte

How to Keep Track of Garlic

Not that garlic is all that hard to track but, in my garden, where I sometimes mix vegetables with flowers, it's good to have a system.

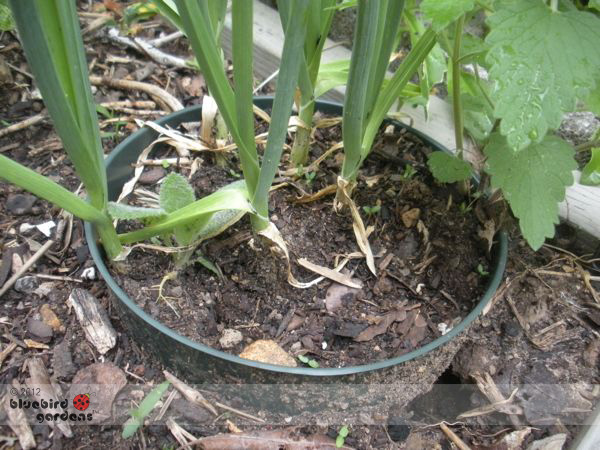
I was given 7 different kinds of garlic to plant this year. To keep track of what and where I planted them, I sunk old plastic flower pots and planted the garlic in them.

I also made stakes from popsicle sticks to keep track of varieties but Cousin George the raccoon had other plans for those sticks.

I'm only sure now of where the elephant garlic is blooming. With the help of pots, I can at least find the other garlics.

Humm, looks like a mole hole next to that pot...

Charlotte